Brandon T. Elliott
CTF Writeup: Trellix HAX 2023 - "Free Yo' Radicals Part I"
The CTF
Trellix HAX 2023 took place from February 25th, 2023 (3AM EST) to March 11th, 2023 (3AM EST).
The Challenge
This reverse engineering challenge begins with a fictional backstory, two packet captures (capture1.pcapng and capture2.pcapng), and a binary called server_binary to download and analyze in order to solve it.
The Packet Captures
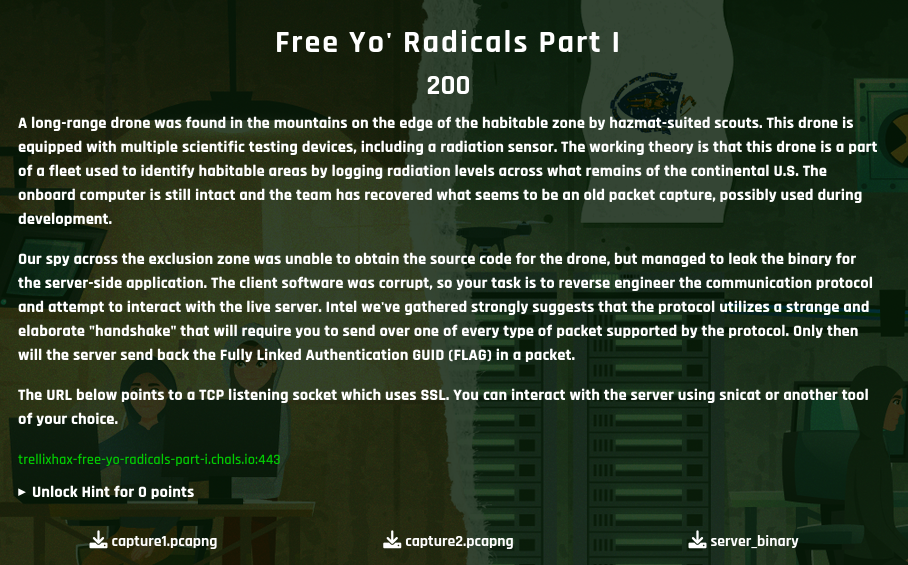
Part of the intrigue of this challenge was the fact that it included some packet captures to analyze in order to assist with solving the challenge, therefore the first thing I did was open them up with Wireshark in order to see what information I could gather from them.
Both packet captures appeared to contain simple TCP streams in the following format:
It appears once the connection is initialized, the server waits for data input. In both packet captures provided to us, the client sends 3 packets, and then the server returns “Bye bye!”
Interesting…
Manual Inspection
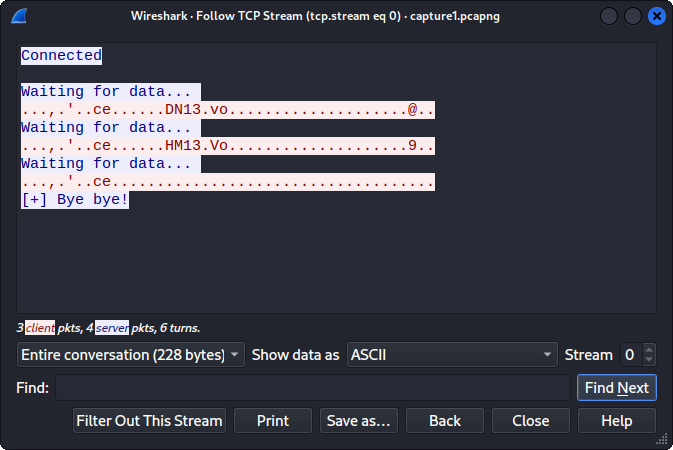
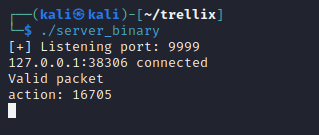
The next step is to see how this works for ourselves by starting up the server_binary file.
The binary appears to listen on port 9999.
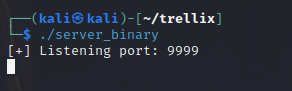
We can use nc to communicate with it locally.
However, after sending some test data to it, we don’t see the “Bye bye!” message as seen in the packet captures, and furthermore, the server_binary has indicated there are errors with our packets:
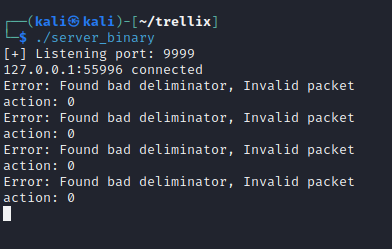
Ultimately, we could try sending the exact same data as seen in the packet captures in order to get the “Bye bye!” message to print, however, since that didn’t seem to print the flag within the packet captures, there must be more to the challenge than that.
Therefore, it was time to disassemble the binary with Ghidra to take a look at what exactly was going on.
Ghidra
Defined Strings
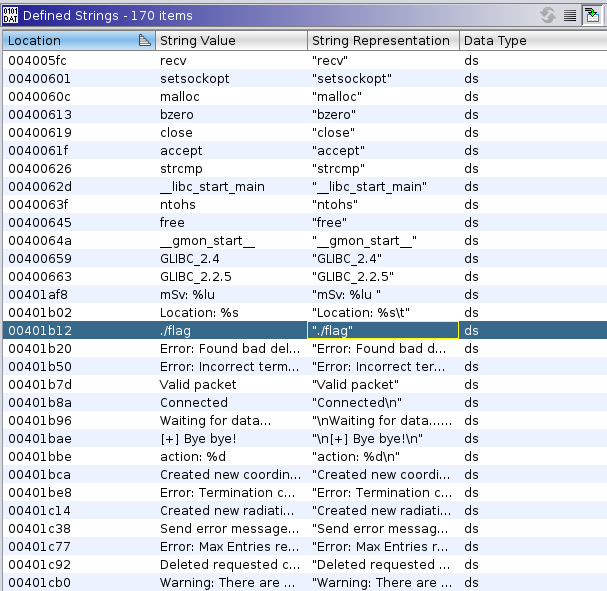
A quick perusal of the defined strings within Ghidra shows a reference to ./flag which presumably is where the flag is stored on the server.
We also see some other interesting strings, such as Valid packet and the Bye bye! message that we saw previously.
The print_flag Function
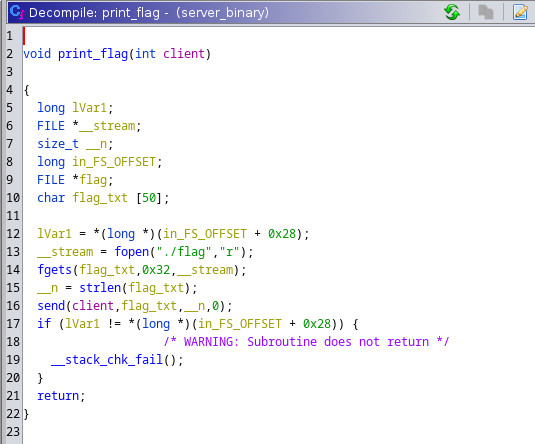
The ./flag string appears to be located within the print_flag function, which looks to be pretty straightforward, and doesn’t really require additional cleanup in order to understand its purpose.
This function simply reads the contents of the file ./flag and sends it to the client.
But where is this function called?
Searching for references to this function leads us to a new function…
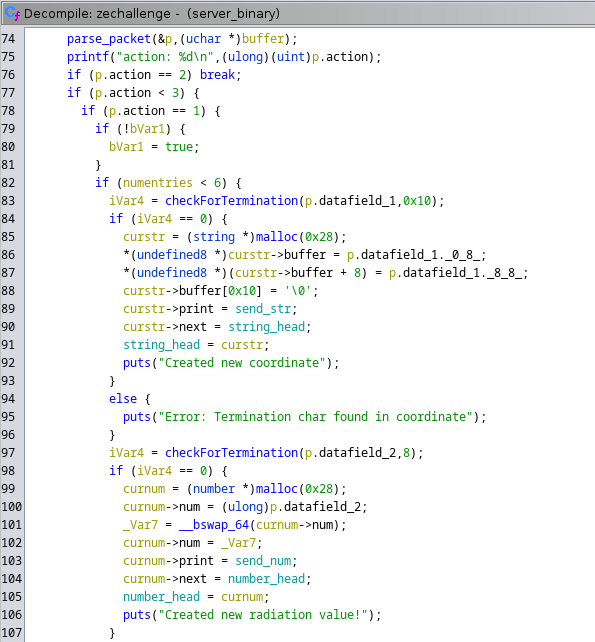
The zechallenge Function
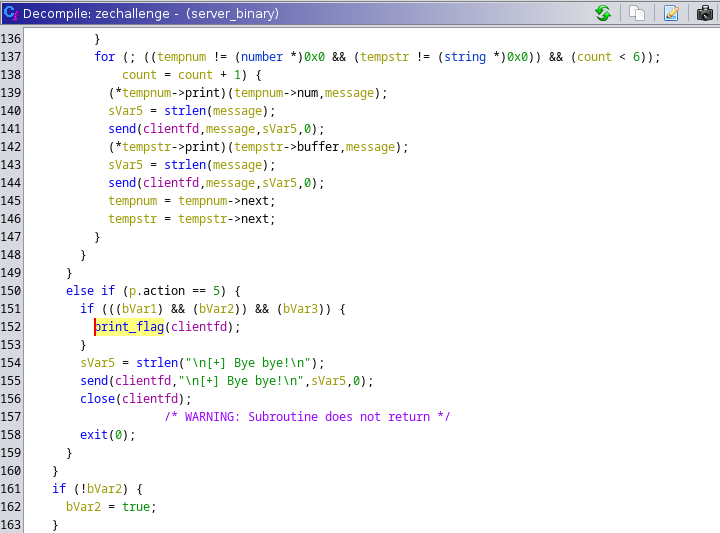
On line 152 of the decompiled zechallenge function, the reference to print_flag can be seen.
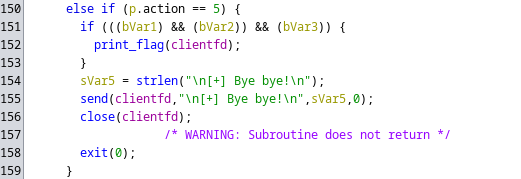
However, within the else if block where the action is 5, it appears to check multiple conditional statements as a pre-requisite to calling the print_flag function, therefore it’s seemingly possible to reach the Bye bye! message and close the connection without printing the flag at all, which is what we saw happening before within the packet captures provided.
So, what we know about the packet captures now, are that the last packet sent contained an action of 5, however it did not meet one or more of the conditions bVar1, bVar2, and/or bVar3.
The parse_packet Function
Finding references to p.action leads us to the parse_packet function, which is decompiled as seen below:
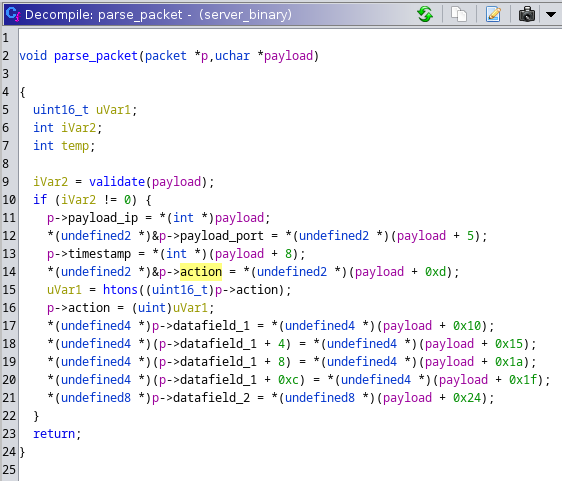
This function appears to parse data such as IP, port, timestamp, action, and datafield_1 and datafield_2 from the packet sent by the client.
This is definitely helpful information, however, it also appears to validate each packet prior to parsing the data, as seen on line 9 in the image above.
We need to take a look at this function next.
The validate Function
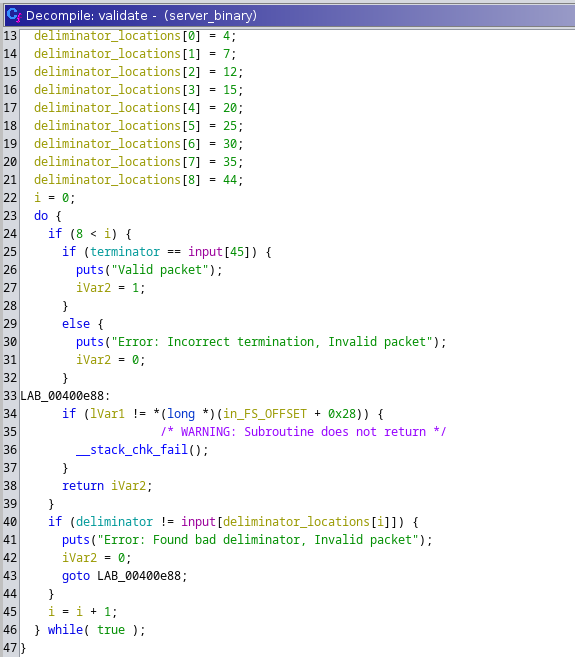
This function clues us in on how we will be able to generate “valid” packets according to the binary.
Lines 13-21 give us the indices of where “deliminators” need to be, and line 25 indicates where the “terminator” needs to be.
By double-clicking on deliminator and terminator on lines 40 and 25 respectively, we also see that the deliminator character is 0e and the terminator character is 0c.
Valid Packets
Using this new information, we can make a Python script to generate some packet data in this format!
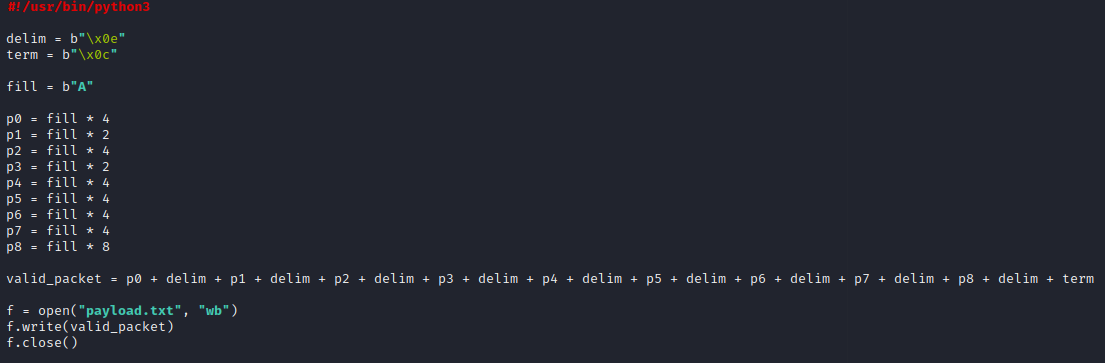
Using the letter “A” as filler, we can place deliminators at the indices specified in the binary, and a terminator at index 45, which is the end of the packet.
After running the Python script, we now have payload.txt which contains the packet data to send, which we can do so with nc after running the server_binary once again.
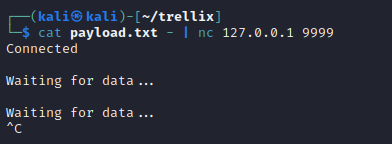
After sending the payload, we can check the output of the running server_binary.
Progress!
It did see our payload as a valid packet.
Now we need to backtrack a little bit before we can bring this all together.
A Moment of Backtracking
-
We know from looking at the
zechallengefunction earlier that the conditional statements are mainly based on theactionfield inside the packet. -
We also know from looking at the
parse_packetfunction earlier that theactionfield is the 4th field of the packet. -
We know that we need the
bVar1,bVar2, andbVar3booleans to beTruein order for theprint_flagfunction to be called.
Therefore, all we need to do now is to figure out what actions, and in what order, will cause the three booleans to evaluate to True, which brings us back to the zechallenge function once again.
The zechallenge Function - Continued…
Starting at line 76 of zechallenge, we see that if the action is 2, it breaks. If the action is less than 3, it goes on to evaluate if the action is equal to 1, and then if bVar1 is False, it will flip it to True.
Therefore, setting the action to 1 in our first packet should work quite nicely.
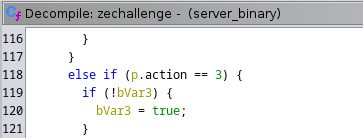
Moving down the line, there is a similar statement on line 118, but for action 3, which will set bVar3 to True.
Therefore, we will set the action to 3 in our second packet.

Going back up to line 76, we now need to break from this statement using action 2 in order for the logic to be able to reach line 161, where a similar statement as before will now set bVar2 to True.
Therefore, the third packet will be set to action 2.

At this point, all three of the required booleans are set to True, and we should be clear to send the fourth and final packet, which will require action 5 in order to reach the logic to check the booleans and subsequently print the flag!
The Final Payload
Building on our initial Python script to make a valid packet, we can now modify it to generate 4 packets, with actions 1, 3, 2, and 5 in place of p3, which is the fourth data field.
After executing this, we now have our final payload written to payload.txt.
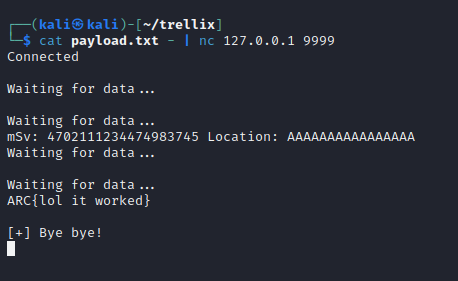
Since we know already that when this is successful, it will print the contents of ./flag, let’s go ahead and create a fake flag using the following, in order to first test this locally:
echo "ARC{lol it worked}" > ./flag
Now, if our payload works, this fake flag should print!
The moment of truth…
Okay, but what about the real flag?
Because the real binary is running with SSL, we need to use sc instead of nc, but other than that, here goes nothing…
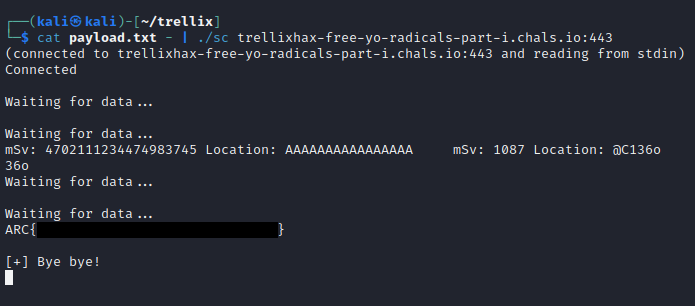
Success!